Embarking on such a journey requires meticulous preparation, often beginning more than 90 days in advance. This all-inclusive guide has been put together for individuals like you, who are not only passionate about hiking but also need help with securing permits, arranging transport, selecting the right gear, and understanding what the trail has in store.
Whether you’re an experienced hiker or a beginner, you’re on the brink of what could be an unforgettable journey of a lifetime.
**Note that the trail is closed due to a norovirus outbreak until at least September 19, 2024, check here for updates.
The Kalalau Trail is the most legendary hike in the Hawaiian Islands and offers not only unbeatable, breathtaking panoramas, but also boasts an exclusive appeal due to a daily cap on visitor numbers.
Let’s take a look at all the moving pieces involved for a successful trip and hike.
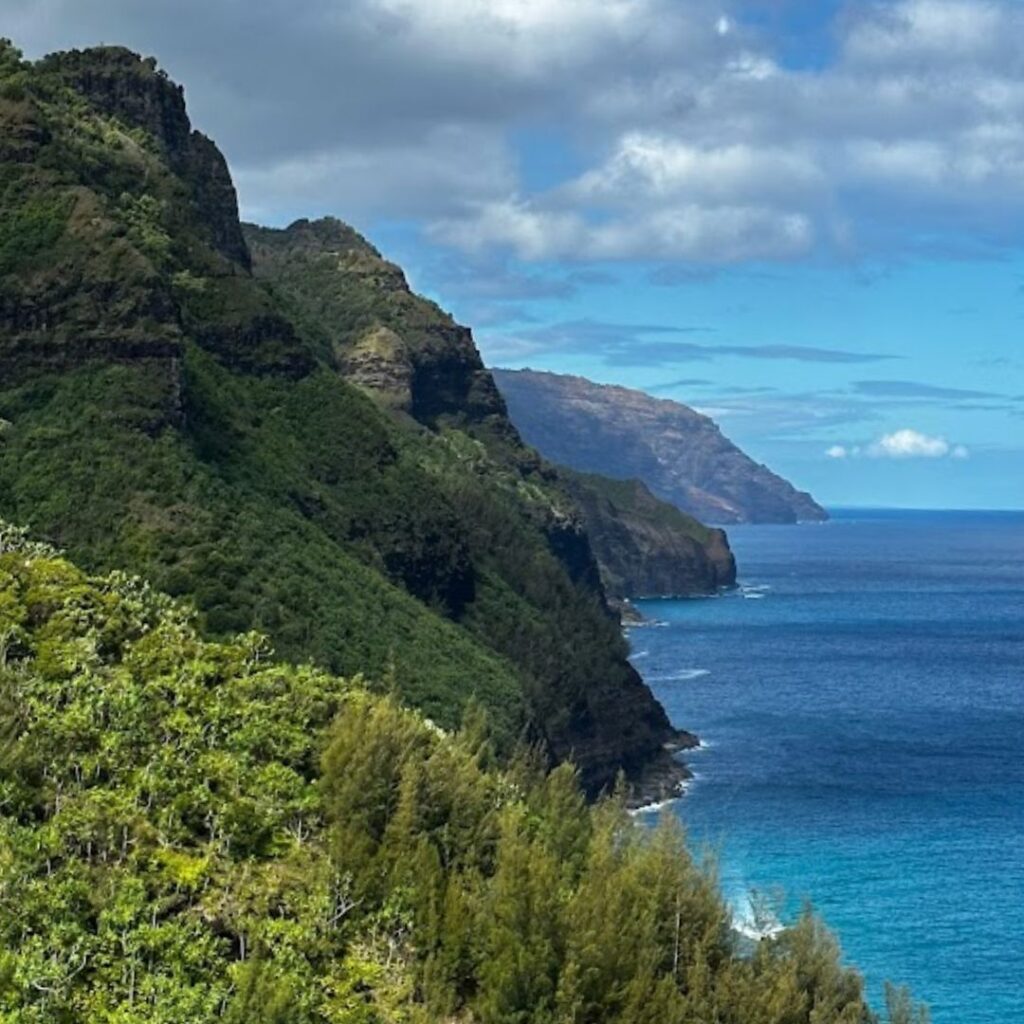
How To Get A Permit For Kalalau Trail
You must have a permit to hike the entire Kalalau Trail and you must have a printed copy on you to show at the gate or as requested by park rangers at any time during your visit.
Getting a permit to hike the Kalalau Trail is considered by some as the most difficult step in the whole process. Here is a step-by-step guide for you to follow and make it just a tad bit easier.
Firstly, navigate over to the Hawaii Department of Land and Natural Resources Online Reservation System and create an account by clicking Login in the top right-hand corner, this is the first thing that you want to do because it is required to get a permit; this will cost you nothing and will definitely make the process easier later on.
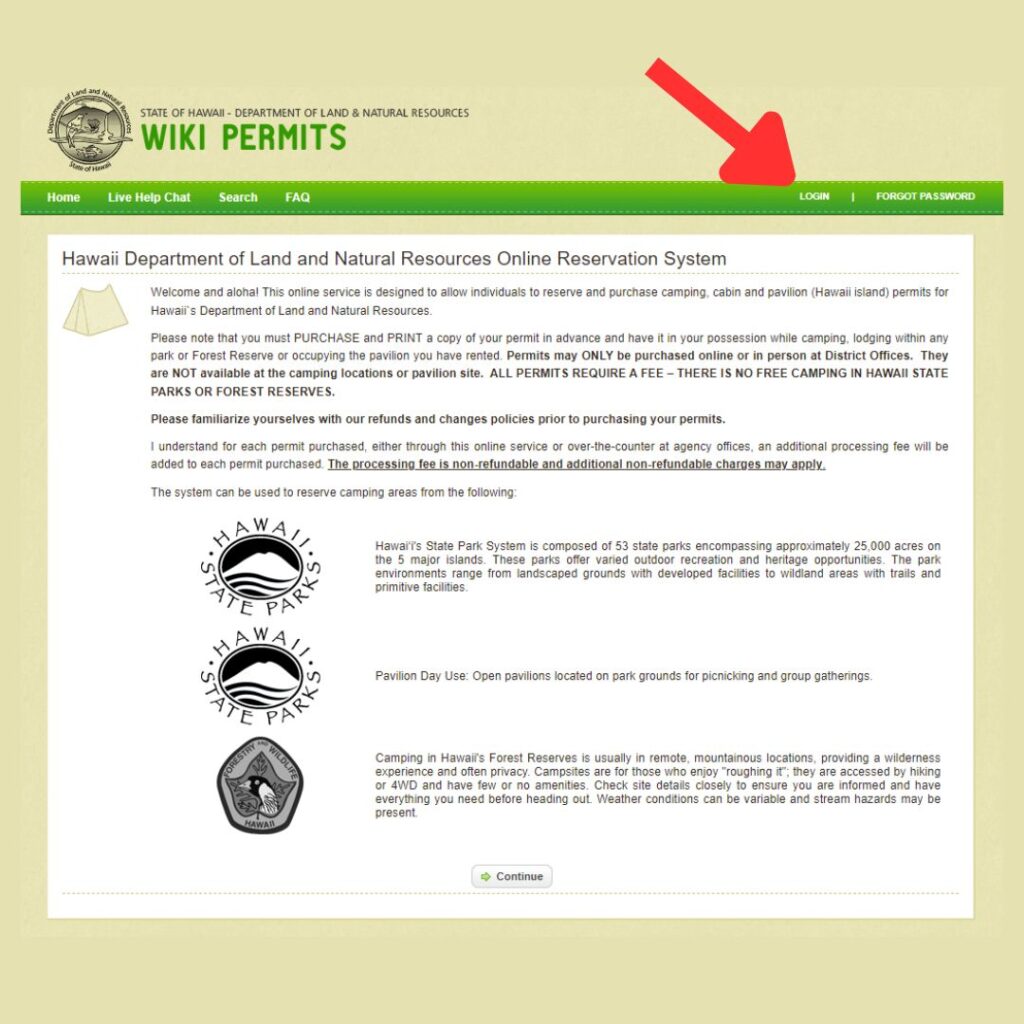
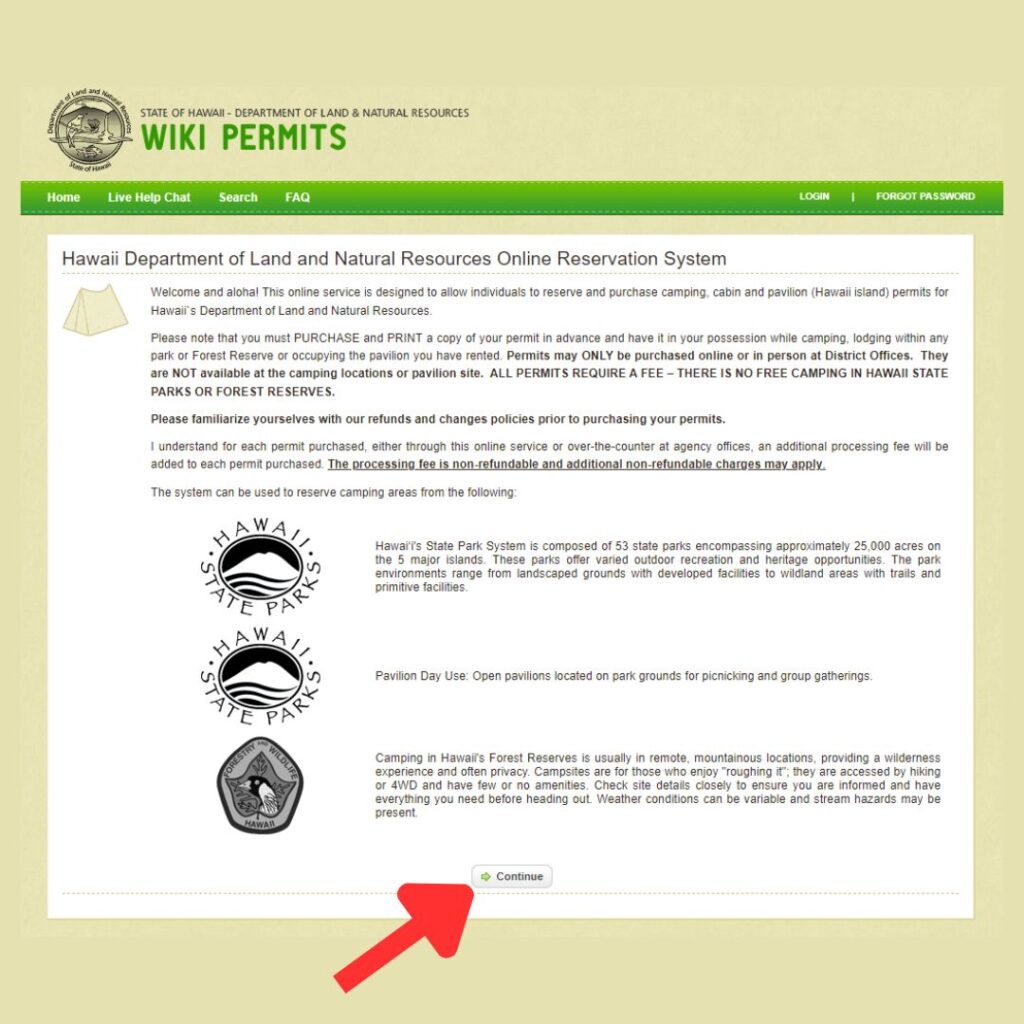
After creating an account, go back to the previous page which should be titled “Hawaii Department of Land and Natural Resources Online Reservation System” and click “continue” on the bottom center of the screen.
You should then be taken to a page titled “Selections”. With either the Island dropdown menu on the left or island name blocks, make sure to select Kauai as your island.
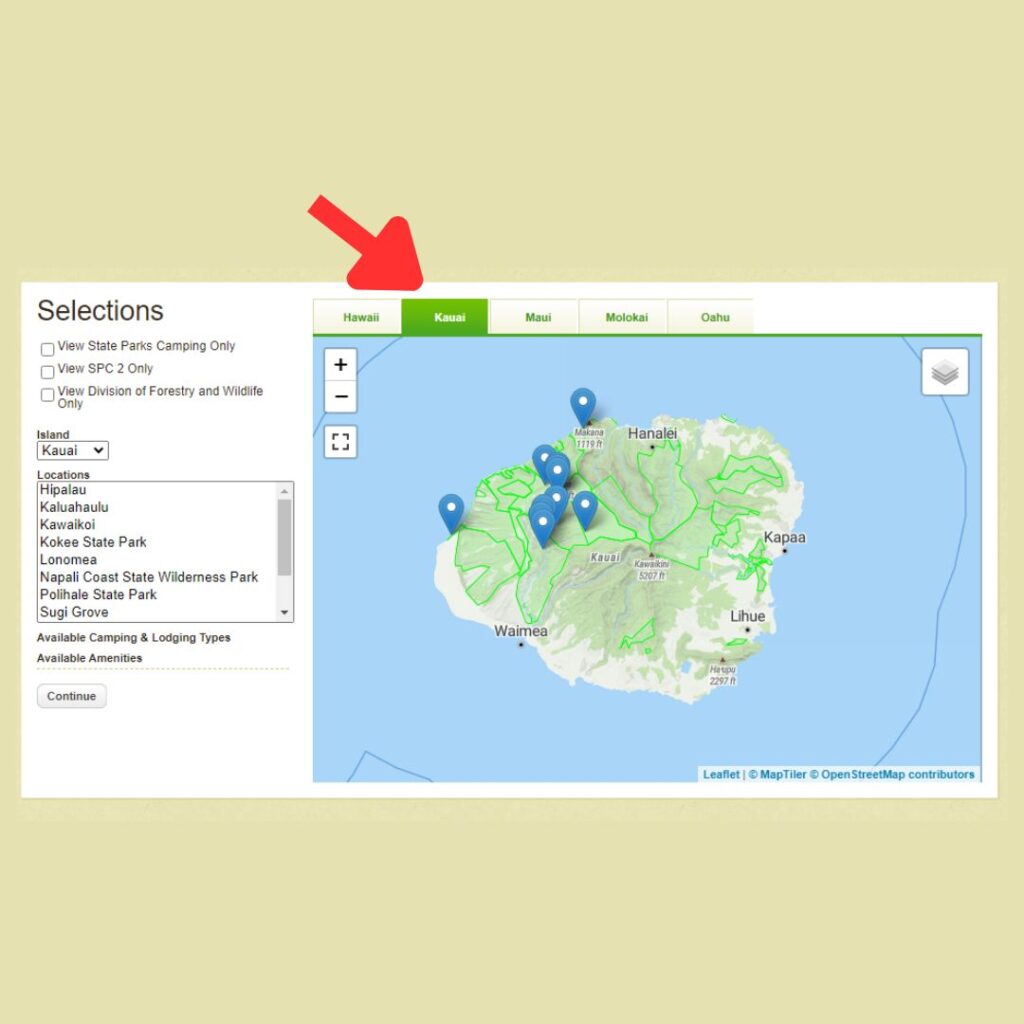
Once you’re on the Kauai page, select “Napali Coast State Wilderness Park” from the dropdown menu or by hovering over the pinned locations on the map and click “Continue” in the bottom left.
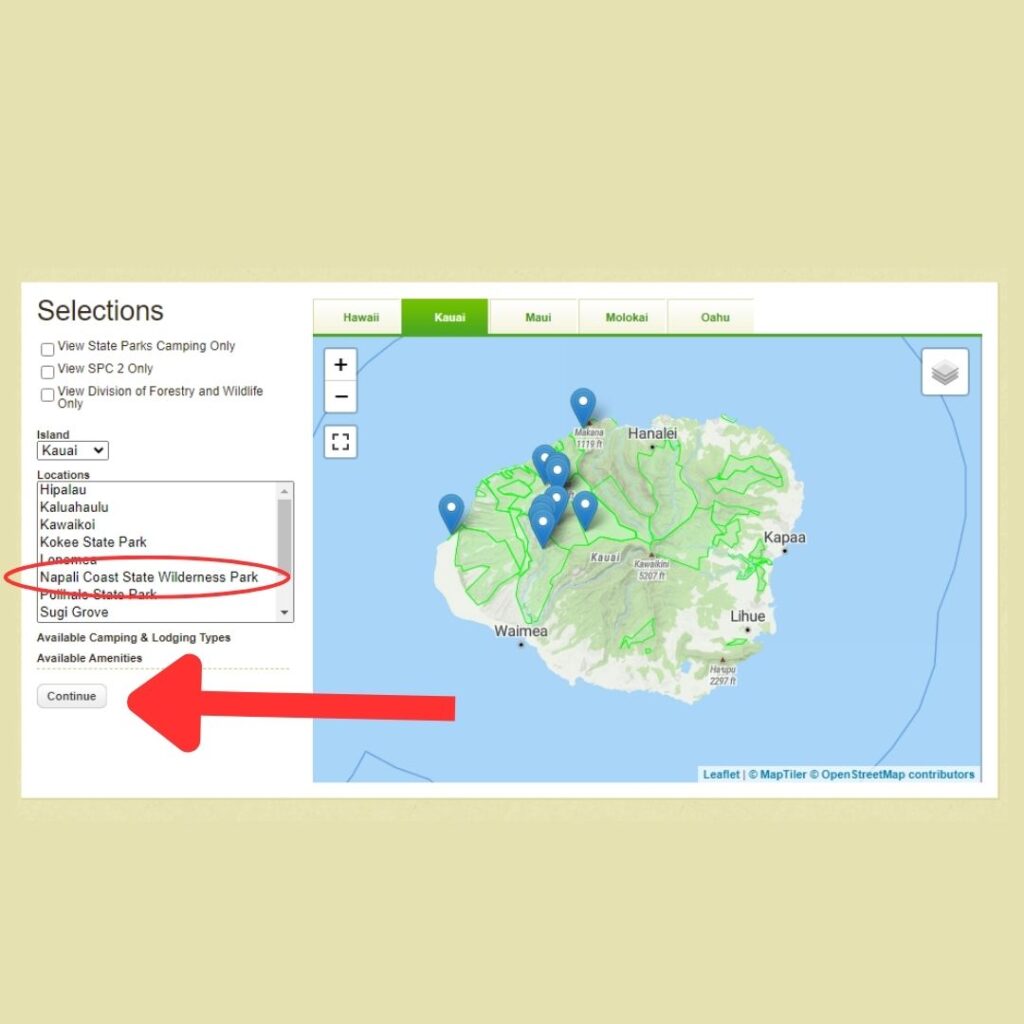
Next, you’ll be presented with a screen detailing necessary information about the hike, including hazards and warnings.
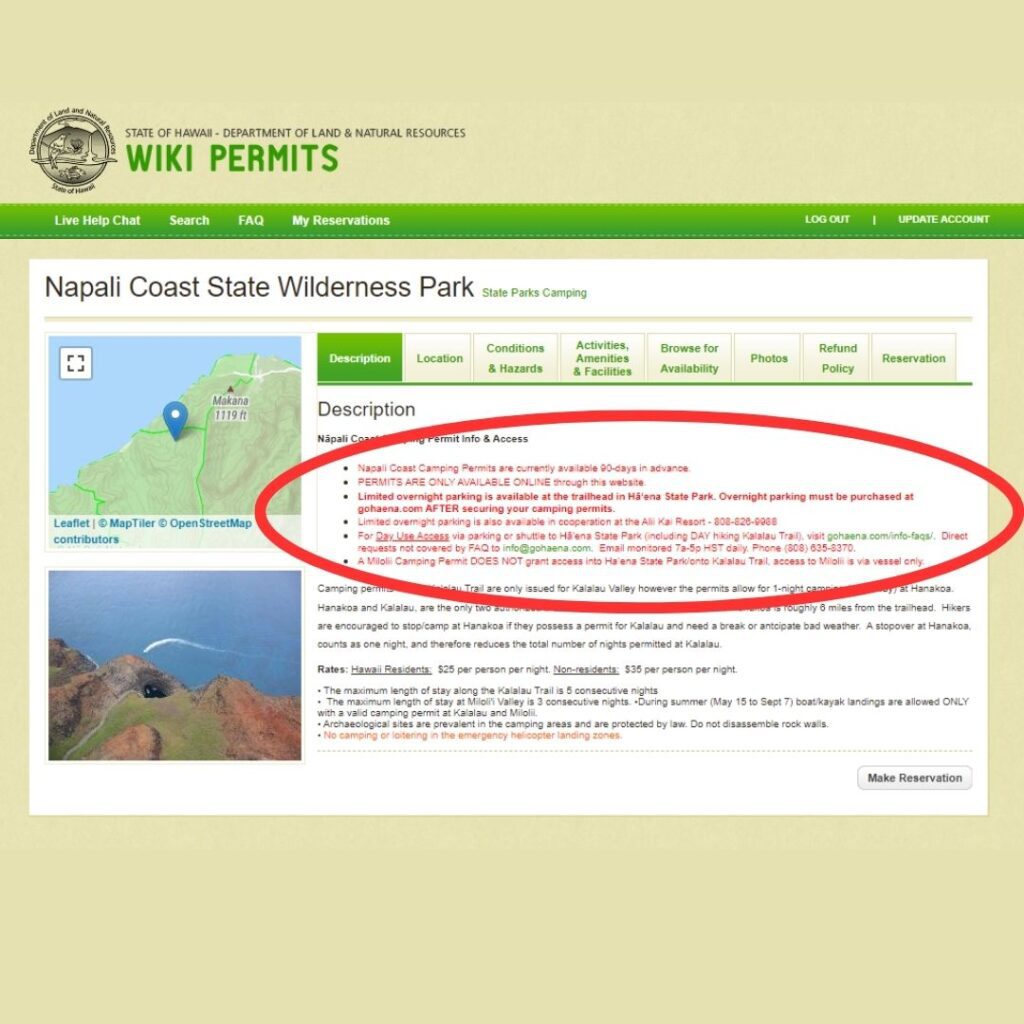
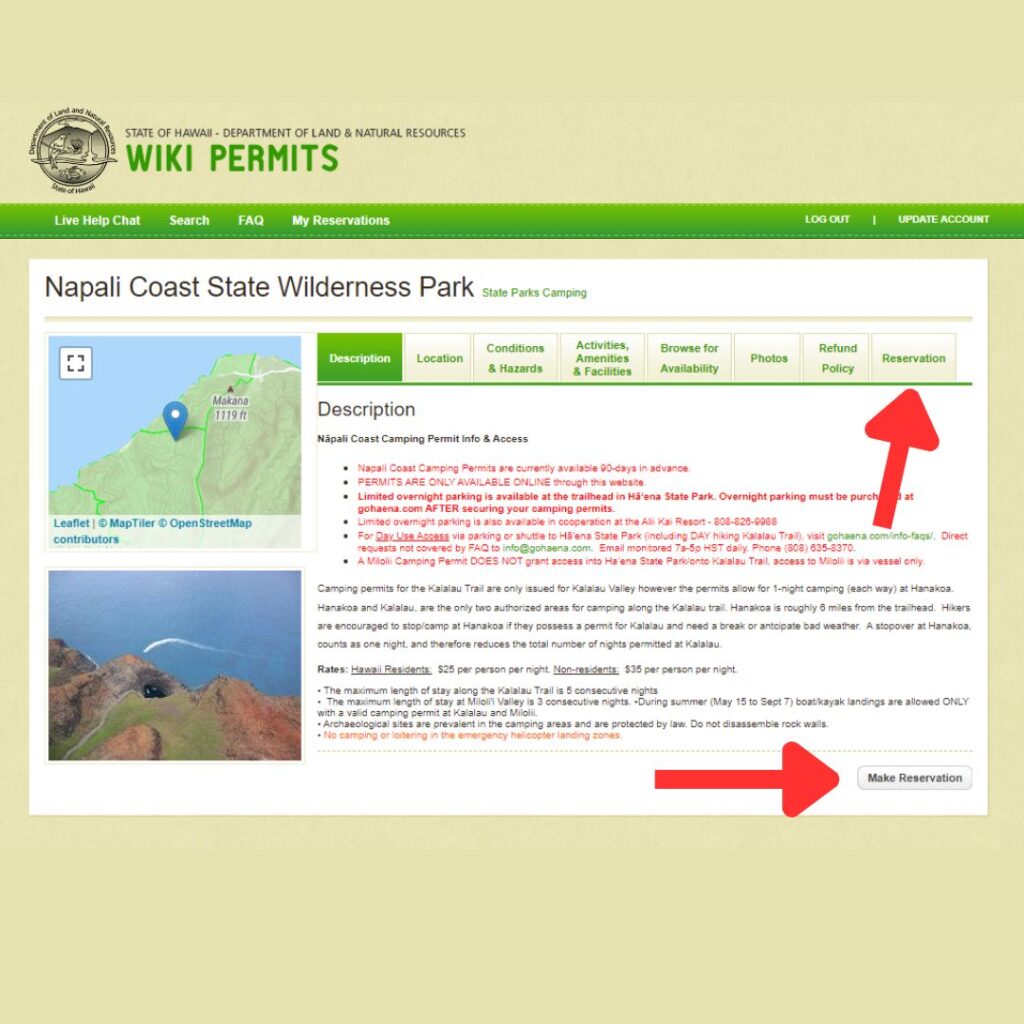
By either clicking “Make Reservation” or navigating to the “Reservation” tab you’ll be sent to the page in which you can continue with the permitting process.
You will then be presented with a variety of information to fill out. Just note that the only boxes you need to fill out are the ones that are circled in red.
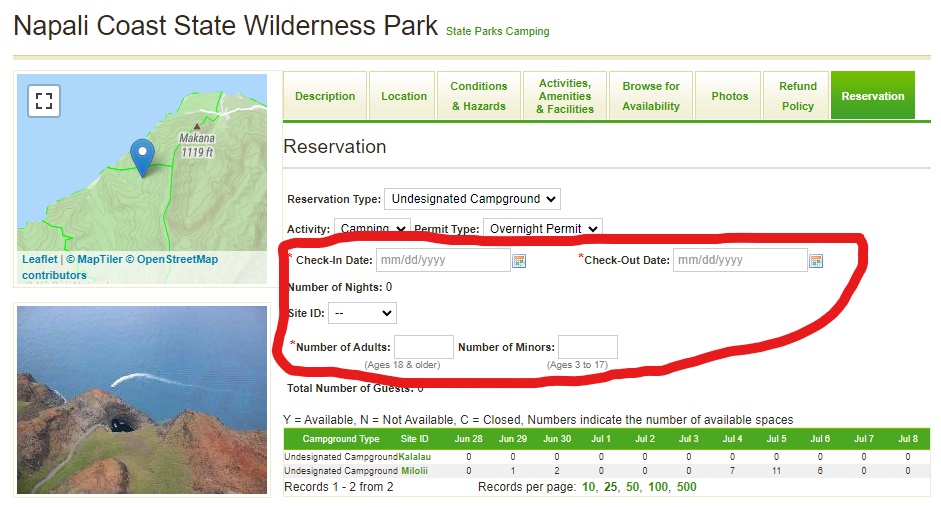
When editing your dates, the green graphic on the bottom of the screen will visualize the dates and tell you how many spots are open, if any. You want to be looking at the “Undesignated Campground – Kalalau” line. Undesignated means you don’t have a specific spot at the campground, you can pick from available spots when you arrive.

Fill in your check-in and check-out dates and the number of people traveling (Max 6) and continue.
If you are a Hawaii resident, this permit will cost you $25 per person, per day. Those who aren’t residents are charged $35 per person, per day.
After finalizing the dates, check your email for the permit and download it immediately so you don’t end up forgetting.
IMPORTANT: You need to print up a physical copy of the permit, if you don’t bring a paper copy of the permit with you then you cannot enter the trail. You also need to have a physical copy on you at all times during the hike and be prepared to present it to park rangers when asked.
Finally, if you need to remove or change a person from the trip, it should be noted that the primary permit holder cannot be changed/removed from the permit. Make sure that the primary permit holder is the most reliable and will unreservedly attend the trip.
When Are The Permits Available For Kalalau Trail?
Permits are available for booking 90 days in advance, no earlier; however, it is possible to book further ahead which I will covert.
Permits open at 12:01 am HST every day so make sure to plan accordingly because spots get taken really fast. Even as a Hawaii resident, I had to log on at 12:01 am in order to get enough spots for me and the people I traveled with.
I highly advise you to book your flight after you get the permit because you could end up not getting the date you wanted and now you have to reschedule the flight. So, to save you some money and a hassle, make sure to get the permit guaranteed first and then book your flight.
If you’ve already planned your flight but cannot get a permit, you can always repeatedly check the site just in case someone backs out at the last second; although it is uncommon, you still have a chance.
How Are Dates 90+ Days Away Being Booked?
If you’ve been looking at the availability dates for Kalalau Trail and are confused about how dates that are 90+ days away are being booked here is why.

In this photo, you can see that I selected September 25th as the date I wanted to hike (which is to be exactly 90 days out from when I am writing this), but somehow the 26th-29th are losing availability.
While you can only book the first day 90 days in advance, you have the choice to book multiple days (max 5 nights) even if those other dates are past the 90-day mark. You can use this to your advantage by waiting 3 or 4 days before you want to hike and book a 5-6 day window.
If you book multiple days, you don’t have to stay for every day; you can choose to come and go a day or two early, depending on how early ahead you booked.
How To Get To The Kalalau Trailhead
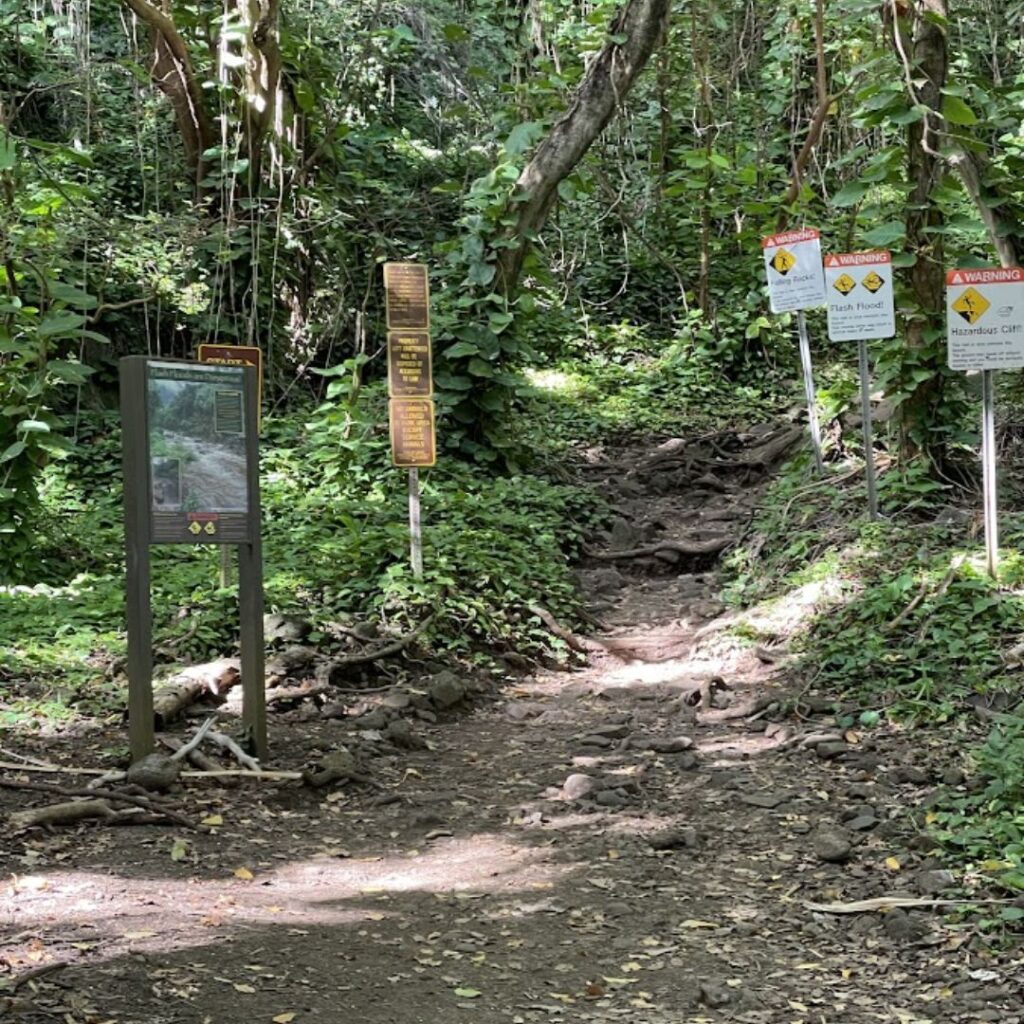
Getting to the trailhead can be a feat in itself; however, there are plenty of ways to get there. An Uber from Lihue Airport to Ha’ena Beach is gonna cost you some $$$. If you travel with Uber, just make sure that you have already purchased fuel and any other items such as hiking poles before you leave because they will not stop at a store for you.
The other hiccup with using Uber is there is no phone service at the trailhead so pickup after the hike is a problem as well as making any changes.
You can also rent a car and park at the trailhead but be aware of the times and rules involved with doing that, you can learn more about that on the DLNR official webpage.
My Recommended Method
The way that I got to the trailhead and the way I recommend is via a private driver that runs from the airport (or hotel) to the trailhead. The driver I used was Kevin, who I connected with through the Kalalau Trail Facebook group. He had my propane in the car at pickup, met me at the airport, offered tips for the trail, and picked me up at a set time when we finished.
He also stopped at a local diner for some “fresh” food which hit the spot after eating packaged stuff for 3 days. Knowing this piece of the logistical puzzle is taken care of makes for a more enjoyable trip. I did a review of my hike to Kalalau and talk about it in a bit more detail if you are interested.
What To Pack For Kalalau Trail
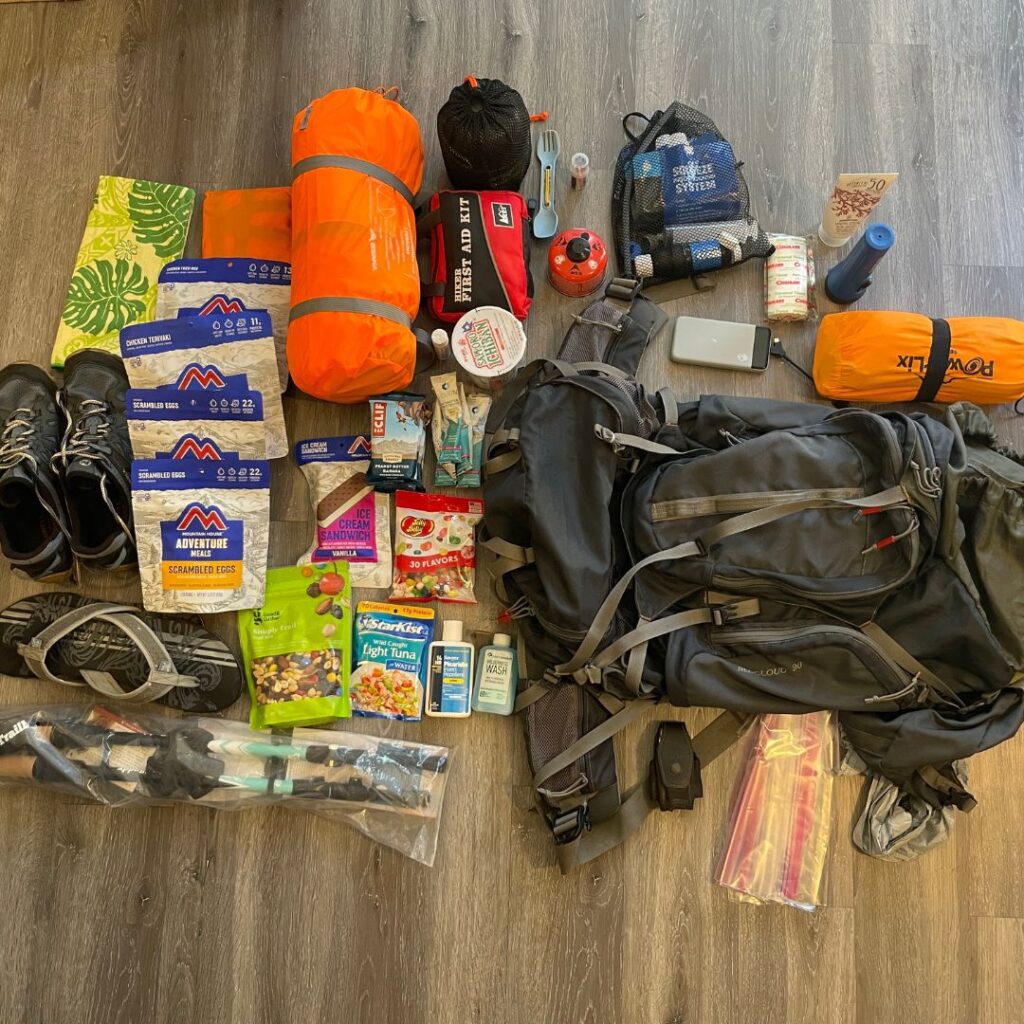
Camping Gear
Tent – I used this 2-person portable tent by BISINNA, this tent was pretty tight for 2 people and 2 bags, but it is perfect if you want to lose some weight in your pack. If you really want to keep your weight down then a hammock is the best choice, the next time I do this hike it will be with a hammock.
Sleeping Bag/Pad – Instead of a heavy sleeping bag, I used this lightweight inflatable sleeping pad as a bed, substituting comfort for lighter weight is definitely something to consider. This sleeping pad had geometric shapes that inflated and at first glance, I didn’t think it would work well. When I laid down it felt like I was on a cushion of air, very nice.
Mobile Water Filtration System – I used the Sawyer Water Filtration System on the hike to help filter out any pollutants or debris in the water. It comes with 2 bags that came in handy to store unfiltered water without having to pack another bottle.
Backpack Rain Cover – The weather on Kalalau Trail can be unpredictable, so I made sure to pack a rain cover to keep my bag and its contents dry. The weather changes so quickly that I just left it on after a while, super light and secure.
Head Lamp/Flashlight – Many people bring headlamps on the trail but I brought a small flashlight which worked fine. If you plan on heading out real early or arriving late consider a headlamp.
Hiking Gear
Backpack – I bought my backpacks off of Facebook Marketplace for around $30-$50, I used the Kelty Redcloud 90 backpack which is no longer available on Amazon. If I were to do this again, I would definitely go with a smaller backpack to save weight.
Durable Hiking Shoes – Everyone in my group used Merrell brand shoes/boots and they all took a beating. In the end, the best shoes are ones you have hiked with multiple time, do not get new shoes for this hike.
Hiking Poles – I don’t go on many hikes that require poles so I rented a pair through the person that would transport me to the trailhead, I used them more on the way back to Ha’ena Beach because it really aided in balance and keeping the weight off my legs as I got fatigued. Almost everyone I come across in various hiking groups swears by them. I did the whole hike out with them in my pack because I was filming, you can see the shots in the video, so it’s not critical.
Water Shoes – Many people wear water shoes, such as this one, but I brought some slippers to throw on whenever I needed to cross a stream. The slippers were also helpful for walking around at campsites after being in boots all day and stretching your toes.
Cooking Gear
Food – I packed non-perishable dry foods to snack on during the trail, such as Old Trapper Beef Jerky, jelly beans, and Clif Bars. If you’re bringing freeze-dried foods, I highly advise you not to get anything with eggs because they do not come out well and taste like styrofoam, not the way to start the day. The freeze-dried food brand we used was Mountain House.
Liquid IV or other electrolyte tabs – Liquid IV is very easy to use and I put it in every other bottle of water, in addition to helping you stay hydrated it also added a bit of flavor.
Propane Stove and Cooking Kit – I used the Odoland Camping set that came with a pot, cup, utensils, and handy fishnet bag. My water boiled quickly during each use.
You’ll need camping fuel but you cannot bring propane on an airplane. You need to buy it locally or if someone is transporting you to the trailhead, they can most likely provide some. Here are some local places that sell fuel: Pedal & Paddle in Hanalei, Kayak Kauai in Kapa’a, Ace Hardware in Princeville, Ace Hardware in Lihue.
I heated 11 meals during my trip and still had fuel left over, don’t overpack.
Other Gear
First Aid Kit – I made my own first aid kit to contain everything I needed, you can buy the majority of these items on Amazon. I find most pre-packaged kits missing key items or full of wasteful extras, build your own kit.
Sunscreen – The sun will be on you all day during some portions of the hike so make sure to bring a reef-safe high-SPF sunscreen, like this one
Toothbrush and toothpaste
Socks
Waterproof Matches – While your camping stove may come with a starter built in, it can always fail at any time so make sure to stay prepared.
InReach (Satellite Communication Device) – I didn’t buy this but others have bought it in the case of an emergency since there is no cell service on the trail. Great for piece of mind on the trail and also for helping others.
If you have an iPhone 14, you can use the emergency satellite feature that is built into the phone. Learn more about how to use this feature here.
Small Kitchen Towel – A lightweight microfiber towel is perfectly fine, I used one after a shower in the waterfall at Kalalau Beach and for wiping my feet dry after each stream crossing.
Waterproof phone case – you can buy some high-quality cases here; however, I used simple Ziploc bags since there isn’t any swimming or deep wading necessary on the trail.
Portable Battery Pack – Here is the Skullcandy Portable Bank that I brought along. Since I was filming the whole thing, I needed multiple charges to make it through the whole hike and the plane trip back. This charger got me 2.5 charges on my iPhone which I used down to 5% both times, very handy.
Camp Soap – Regular soap can harm wildlife. Make sure to bring biodegradable camp soap on your hike, like this one that also includes a bug deterrent. I recommend you don’t use this in any of the streams, just the waterfall at the end.
Biodegradable Toilet Paper – I brought a pack of camping toilet paper since there are no stocked restrooms along the hike, Coghlan’s brand is the one I used and takes up very little space in your bag.
Multi-tool – I used an old Leatherman that I had, Leatherman is a very well-known brand and produces high-quality equipment for camping. I didn’t use it on my hike but you never know when you need a sharp blade.
What Not To Do On Kalalau Trail
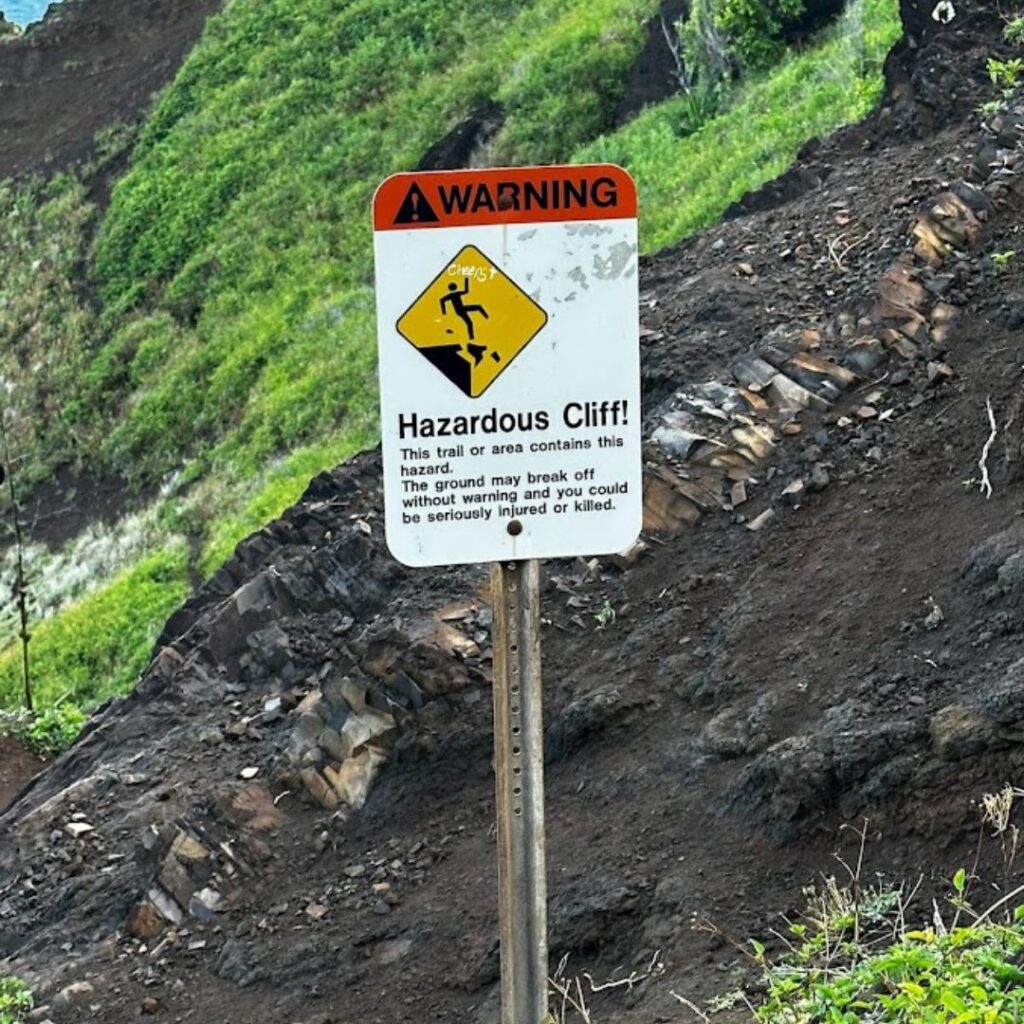
Kalalau Trail is an amazing adventure of a lifetime with incredible views and sights not many get to see; however, there are still things that you need to be careful about, things that can be dangerous if ignored.
Firstly, manage your water. During the summer months, not all of the streams are flowing so you should be prepared to store extra water.My travel group and I brought a medium-sized water bottle per person and 4 32oz filter bags along with us on the trail. At every major stream, we filled up every bag and water bottle and still ended up using all of it before the next stream.
During the winter months, which I have not hiked, I hear that every stream is flowing and you can reduce weight by only having one bottle full at a time. Plan accordingly.
Pack out what you pack in, there are no trash cans at any of the camp sites so make sure to pack all your trash in your pack. Do not litter anywhere on the trail, we need to respect the place that is Kalalau and keep it free from garbage that may harm wildlife and will ruin this amazing location.
Do not leave extra supplies at Hanakoa campsite or Kalalau campsite. You may think you are helping someone but you are just creating trash. If someone really needs extra fuel they can ask another camper who is onsite, to stop leaving your fuel cans.
Do not compare this 11-mile hike with an 11-mile trail, this trail has many ups and downs and switchbacks. You need to be in very good physical condition to do this hike, or else you risk putting rescue personnel in a tough position. Do not think this trail is easy, you will be tested not only physically but mentally also, make sure to prepare and train adequately before hiking.
I know I said earlier that the permit is the hardest part of this trail but honestly its the physical conditioning needed, start training now.
What To Expect Along Kalalau Trail
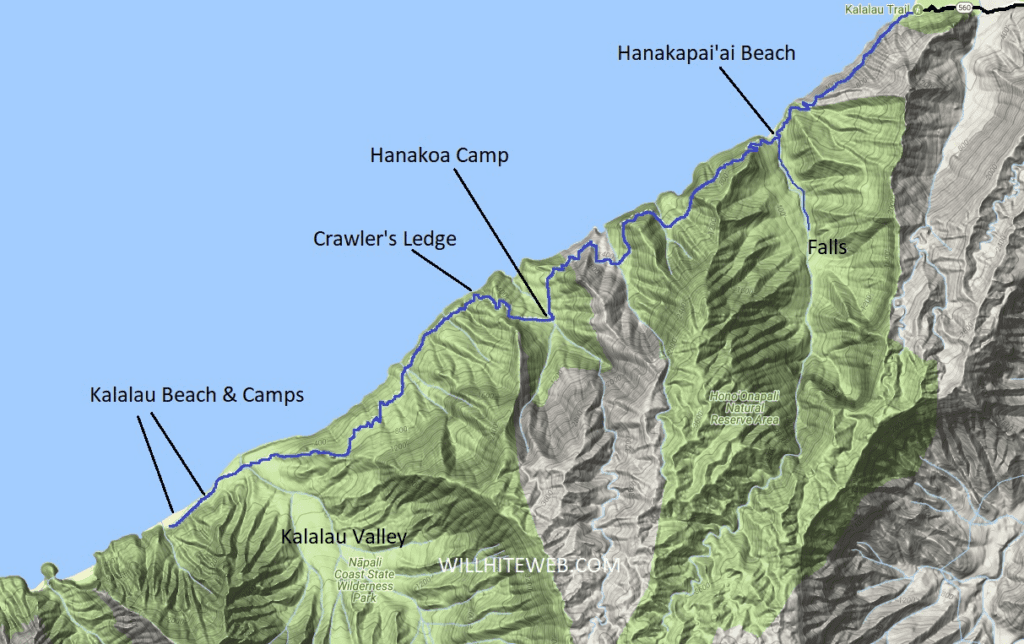
Kalalau Trail is known for its end location, Kalalau Beach and camping grounds but there are plenty of other picturesque locations along the way, 2 of them not needing a permit to visit.
Follow along on the map as I talk a little bit about each location in order of appearance and any permits or reservations you may need.
While I will go over all the main attractions here, you can read my fully detailed review of the hike here.
Hanakāpīʻai Beach
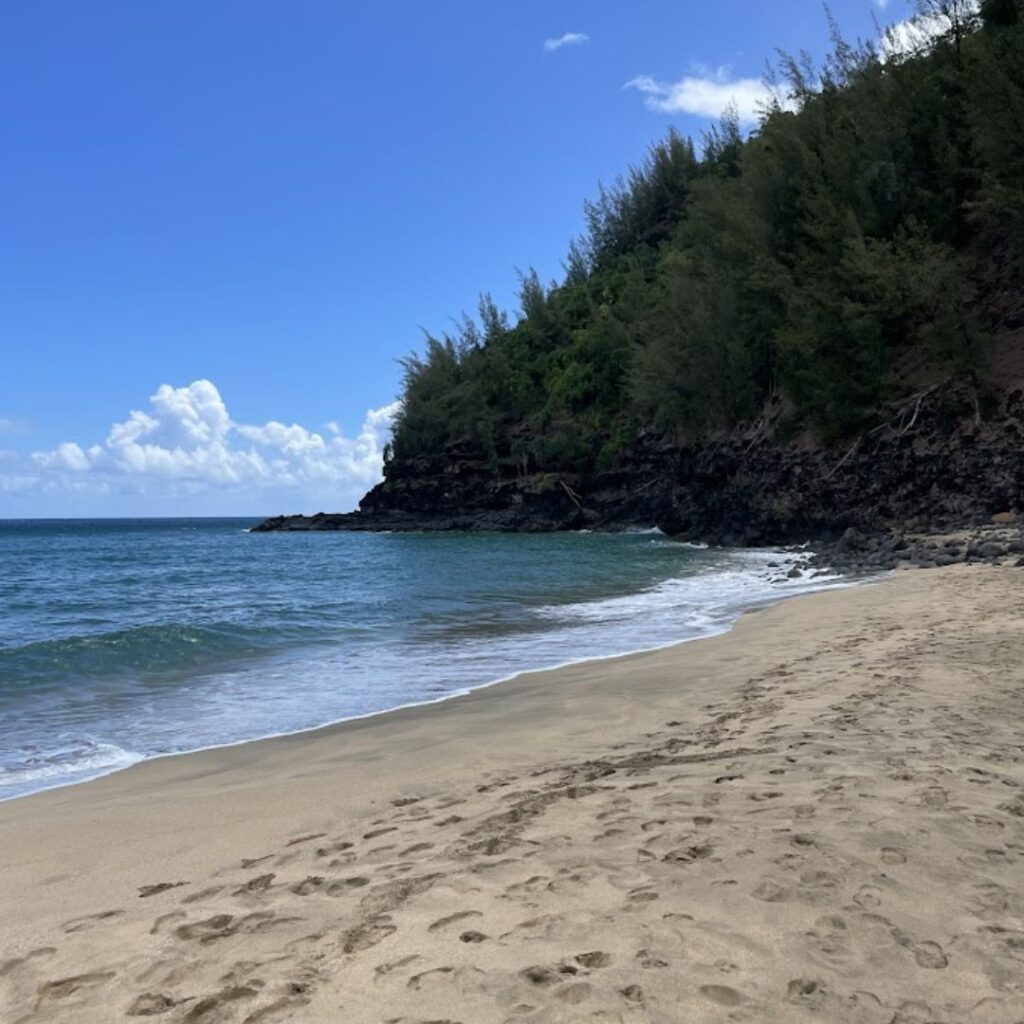
Located only 2 miles from the start of Kalalau Trail, Hanakāpīʻai Beach is the first major landmark that you will come across. Unlike the rest of the hike, no permit is needed to visit this beach but you must make reservations here; any location after Hanakāpīʻai Valley requires a permit to hike.
Known as one of the most dangerous beaches in Hawaii, Hanakāpīʻai Beach is a location that should be visited with safety in mind. This is not one of the locations where you would want to go swimming or turn your back to the water because rough waves can be dangerous if you aren’t paying attention.
My recommendation is to just stay out of the water here and if the stream is high do not attempt to cross.
Hanakāpīʻai Falls
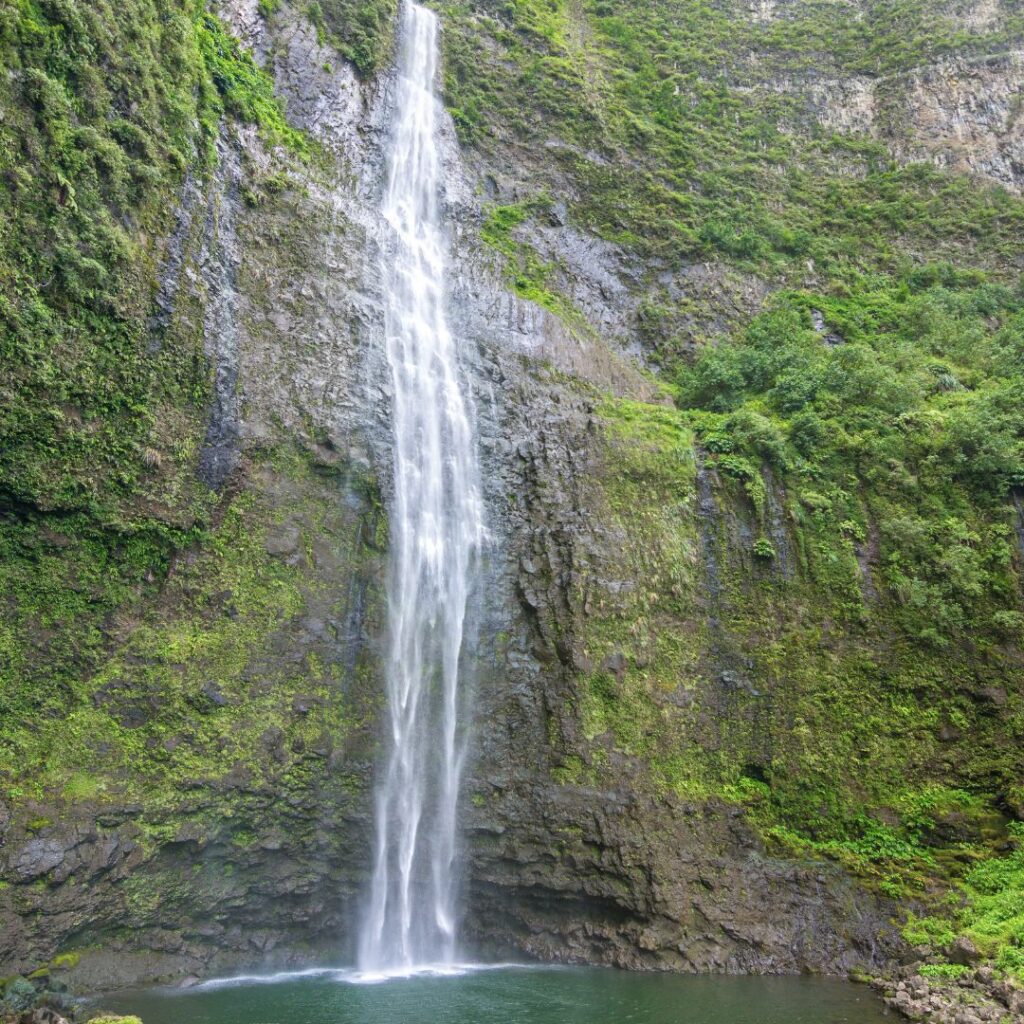
2 miles towards the mountains from Hanakāpīʻai Beach is a waterfall by the same name. Just like the beach, no permit is needed but reservations are required to hike to this beautiful location. A popular day hike is to the beach and falls, totaling at around 8 miles round trip.
At the bottom of the waterfall is a large pool with cold refreshing water, perfect for taking a swim after a long hike there. This is a very popular location but just know that the hike to the falls is strenuous and you need to be prepared to walk back.
Hanakāpīʻai has no tables or picnic area so be prepared to seek out a few good rocks to sit on and enjoy any snacks. I found the sand area near the stream to have lots of ants so keep an eye out.
Are There Bathrooms on the Hanakāpīʻai Falls Trail?
Yes, there are bathrooms on the Hanakāpīʻai Falls Trail. It is located right after you cross the Hanakāpīʻai stream and head up to the left. This is the start of the Hanakāpīʻai Falls Trail.
Hanakoa Camping
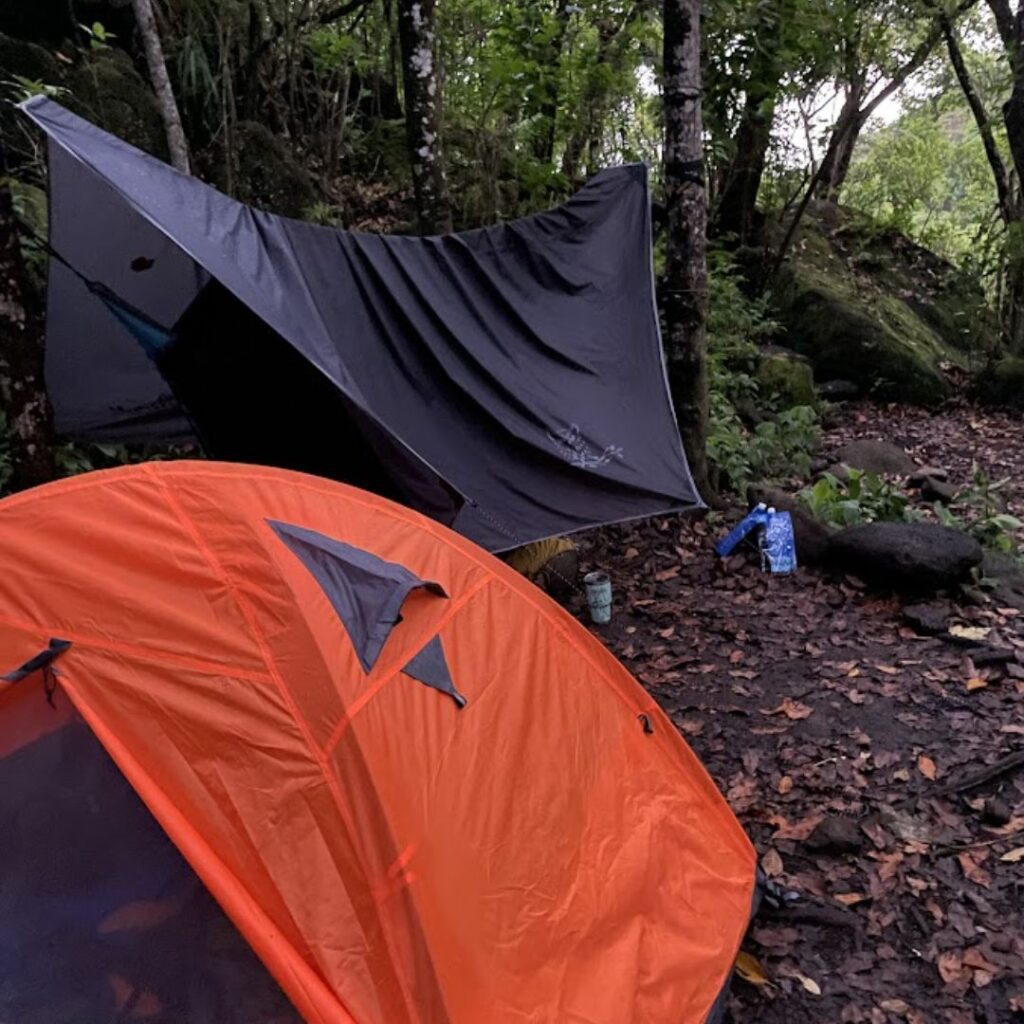
Halfway through this tough hike, you will come across Hanakoa Campsite and Hanakoa Falls. In order to reach this point of the trail it is required that you have a permit and a physical copy with you.
If you are struggling with the idea of hiking 11 miles straight consider camping here to break up the trip. We arrived late, 9 am on our first trip out and needed to camp here because of the time. Plan your number of nights needed accordingly if you plan to camp here both ways.
There is an open pit bathroom here that is disgusting, you have been warned. Otherwise, there is one structure with a picnic bench and several camping sites.
I recommend you cross the stream before setting up camp, this way you are not blocked from continuing if you get a lot of rain the night before.
Be prepared for rain, bugs, and the wonderful sound of the stream to lul you to sleep. A deep forest camping experience.
Crawler’s Ledge
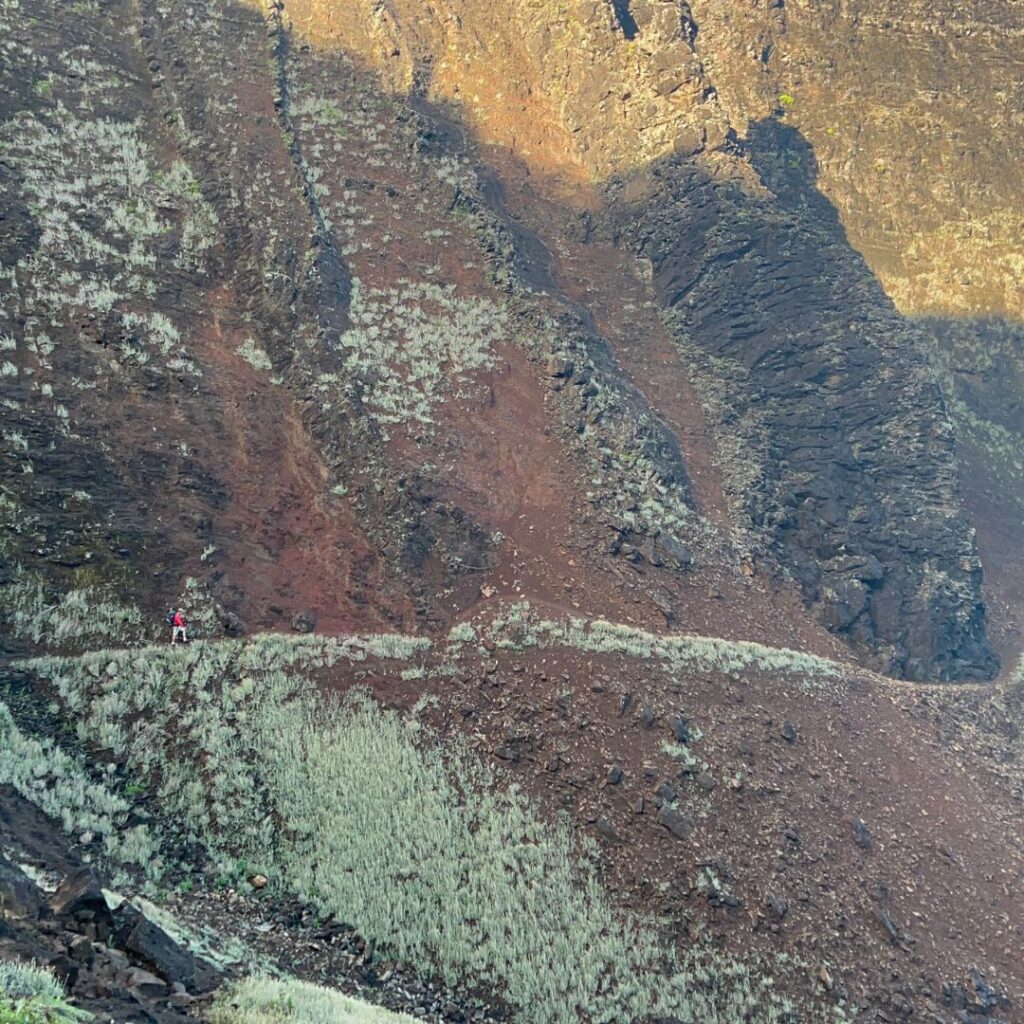
Heading out from Hanakoa you will come up on the famous Crawlers Ledge section fairly quickly. It’s proceeded by a wide open area looking down into the valley floor that ends in the ocean. The picture above is from one side to the other with the trail being a switchback down a gravely narrow path.
Physically quite simple and not strenuous, however, you need to keep a sharp eye on your footing the entire way. Loose rocks and slippery gravel are found all the way until the ledge.
The ledge itself is solid and feels quite safe except for the fact that you are on a steep ledge with nothing but rocks below you before the ocean. If you have a significant fear of heights then this hike is not for you, I personally don’t like heights of this type but had no program traversing the area.
After the ledge is more slippery dirt with sketchy footing before you start to head down towards Kalalau Stream. Once you cross its only a short way before you are walking along the waters edge to the campsite.
Kalalau Beach Camping
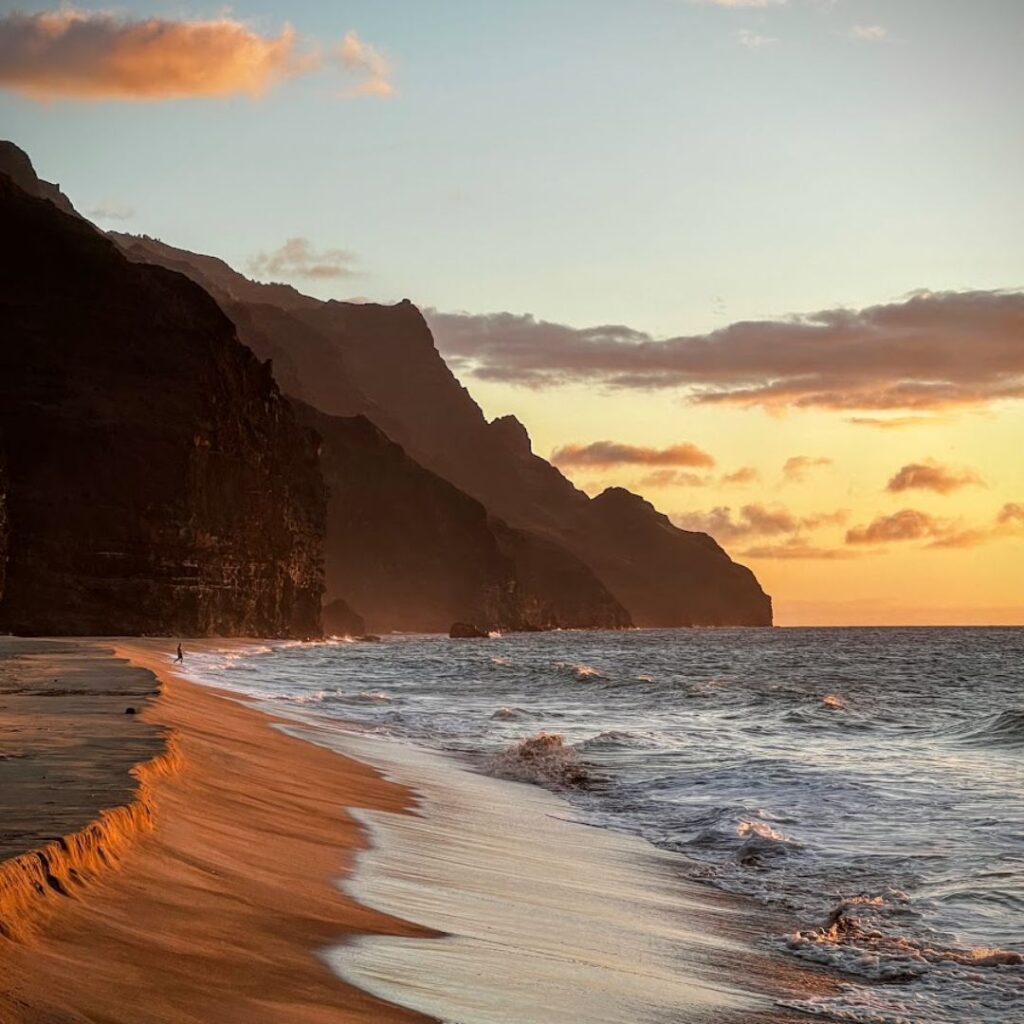
For most, this is what the hike is all about.
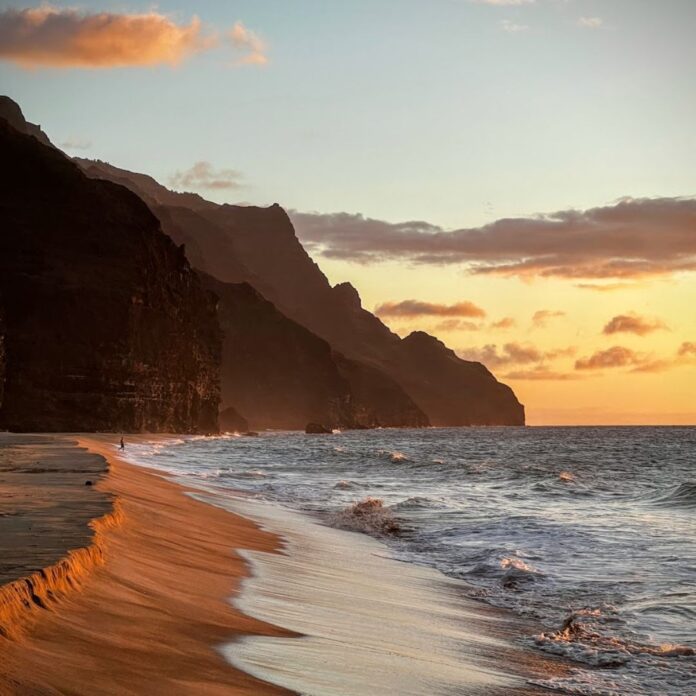
The camping area is quite large and it is easy to find a spot to yourself, try to get closer to the waterfall though as it makes water refill trips a bit easier. I camped along the beach edge, just above the polished stones, and had a great view of the sunset as picture above.
Shower at the waterfall and a couple of bathroom huts that are in much better shape than Hanakoa will get you settled in quickly. Take some time to walk the beach but bring your slippers as the sand gets quite hot during the day.
I was there during summer so the cave was easily accessible otherwise just soak it all in.
I plan on doing this hike again, maybe next year 🙂
Things I Would Do Differently After Hiking The Kalalau Trail Once
Smaller pack to cut down on weight.
Stay the night before on Kauai so I can start the trail earlier and hike all the way to Kalalau Beach in one day.
No dehydrated eggs for breakfast, yuck.
Skip the poles, personal preference.
Bring one less set of clothes to cut down on weight, and wash one set at the waterfall.
Spend 2 nights at Kalalau to relax more and enjoy the destination.
Bring another cup-o-noodle soup cup, it was delicious at hikes end!
Final Thoughts On Hiking The Kalalau Trail
A physically tough hike that should not be taken lightly but worth the effort in every way. Train for this hike if you need to, it will make the whole experience that much more enjoyable. Don’t sweat Crawlers Ledge unless you have an extreme fear of heights, the fish eye lense videos make it look much more narrow then it is.
I look forward to doing this hike again soon, see you on the trail.



I remembering doing this hike and was shocked a people who didn’t bring any water or were wearing flip-flops. There were so many ants!!! It’s amazing, but I will never do it again. It was traumatic!
I saw someone barefoot deep into the hike and of course crocs in the first 2 miles. Yes, the ants! at Kalalau were everywhere, next time its a hammock for me. Glad you did it to share the tale of hiking Kalalau.
And the sign showing the number of drownings!!! Do they still have it up? Oh man, really due for a Hawaii trip…
This hike sounds incredible! I appreciate your advice about training beforehand—it really does make a difference in enjoying the experience. I also love your take on Crawlers Ledge; it’s great to hear it’s not as daunting as those fish-eye lens videos suggest. I can’t wait to hit the trail again soon, and I hope to see you out there!